
This is a tutorial for a teeny tiny waldorf doll in the style of Sew Sweet Dolls

To begin making this fun little doll gather your supplies- you can use recycled supplies, or you can buy high quality all natural supplies, or just use what you have one hand- whatever! :)
You will need
fabric for the skin- should be stretchy. I used organic cotton interlock
Stuffing- fiberfill, wool, bamboo, fabric scraps, ect. I used wool
Yarn for hair
Thread to match your fabric
A small hand sewing needle, a large doll needle, and a jersey ballpoint needle in your machine.
Strong string or thread for tying the dolls head shape
Scissors
Wire (if you want poseable arms) I used lead free aluminum florist's wire.
a book as wide as your doll is tall
inner tubing material for the head- you can purchase fancy smanchy tubing from here or you can just use a cotton baby sock.
embroidery thread for the face (or fabric markers) Pink for the mouth and whatever eye color you prefer

First, take a small piece of wool and roll it into a little ball. At this point you should decide what size doll you are going to make. I was going for between 6-8", so I made the initial ball about the size of a ping pong ball. For a 12" doll, you would want the initial ball to be about the size of a large softball.


After you have your initial ball of wool, tear off a large piece of wool that will cover the ball completely and have a little hanging down like so:

Put the ball into the sock or inner head tubing.
Tie a piece of your strong string for head shaping around the neck, just below the initial ball so that you have some of the square you wrapped over the initial ball still sticking out to form the neck of your doll.


Now tie another piece of string tightly around the head crosswise to form the eye line.

Then tie a piece around the head going from chin to the top of the head.

Then using your small needle and thread, put a few stitches at the place where the two strings cross on wither side of the head to hold them in place.

Then slowly slide the eyeline string in the back down to the bottom of the head. Go slowly and you may have to squish the head in a little to get it down. It's okay- you can reshape it after you get the string down. :)

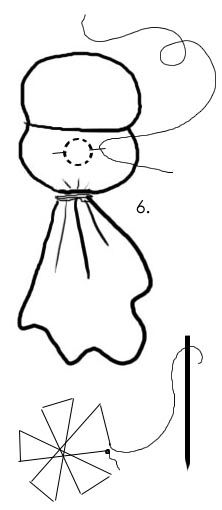
Now add your nose by sewing with your small needle and normal sewing thread across a small circle, all the way around going back and forth and pulling the thread tight as you go to gather a tiny bump. This diagram may help


Now you are ready to cut out the fabric for the head. Lay your skin fabric across the head with the stretch going around the head, not up and down. Cut a piece out that will go all the way around, and is a little longer than the "muff" (the bottom part of the wool that sticks out below the neck. Cut the sock or inner tubing so that it is not longer than the muff.


Then sew the piece of fabric you just cut up that back, curving in at the neck to help avoid neck wrinkles. Trim off excess and turn right side out.


Then put the head and muff into the skin from the top of the skin. Pull the muff down so the neck is nice and snug.
 Then hand sew a gathering stitch around the top pf the head skin and pull it tightly and tie it.

Then pull the skin tightly down at the bottom and tie it just below the muff with the strong string. Pulling it down tightly also helps avoid neck wrinkles. Then tie thread or your strong string around the neck to redefine it.


Next you will embroider the face. Using your long doll needle (a regular long needle will probably work for a tiny doll, but for anything larger than 8" you will need a doll needle) threaded with the pink embroidery floss, go in one side of the mouth and up though the top of the head. Pull the thread till it's out just about 2" out the top. Then rethread the doll needle with the thread hanging from the front of the doll's face. Go in the face on the other side of the mouth and out the top of the head again. Pull tightly and tie off the mouth. Tie it just a LITTLE tighter than you think you want it- it will probably stretch out as your knot settles and you don't want a slack mouth.


Next you will do the eyes in the same manner- push the threaded doll needle through the head at one corner of the eye. Unthread and rethread the needle with the other end of the embroidery floss. Instead of pushing the needle all the way through, go back and forth across to make the eye, then for the final time across, go through the head to the top again and tie off. Repeat for the other eye. If you like a more defined shape, use two strands of embroidery floss instead of all 6 and switch to a smaller needle after you push it through the head the first time and embroider a round or oval shape. You may also use fabric markers or paint for the face if you wish.


Now you are ready to make the arms. Decide how long they need to be and cut out a rectangle the length of both arms, plus the width across the muff. Make sure the stretch of the fabric is going the short way of the rectangle and not across the armspan.

Sew the arm shape on your sewing machine leaving a hole in the bottom to turn and stuff through. You don't have to do thumbs- you can just do a long oval for the arms.

Trim excess fabric and turn right side out. Use a chopstick or a crochet hook to poke out the thumbs if you made them. Fill the thumbs with wool by poking it in with an unbent bobby pin, or a chopstick. Cut the wire for the arms and bend the ends so that the wire won't poke through the fabric.


Wrap the wire with wool roving

Poke the wool covered roving into the arms. If you have trouble getting the roving to stay on the wire you can put the wire in and then add roving around it- just make sure you get it all around it so you can't feel the wire from the outside. It may help to put a little wool in the hands first too.


This is how the stuffed arms should look. There should not be any stuffing in the center- unless you want a hunchback doll.

Place the arms where you think they should go and sew them to the muff at the top and bottom of each arm.


Ta DA!!! The arms are on.

Now measure the rectangle for the body piece. If I had it to do over I would have made this body piece just a little bit longer since her torso ended up being shorter than I like them. The stretch of the fabric should go across the body.

Sew the shape of the doll and cut out, leaving a how on either side for the arms and one at the top for the neck

Turn right side out

Stuff the legs ONLY not the torso.

Put her into her body suit by putting her arms through the neckhole then through the armholes and pulling the muff through


Sew a gathering stitch along the back of the neck so that the front of the neck will be nice and tight. Alternatively you could leave the shoulder open at the top and sew them closed by hand so there would be no slack to be taken up by gathers at the back .

Then at the shoulder, start sewing the neck of the body piece to the neck of the muff/head piece. I like to use a backstitch for this.

Continue all the way around the neck

And when you get to the back, sew the part you gathered before to the neck as well.

TA DA!! :)

Now add stuffing to the torso through the hole of one armpit. Stuff firmly.

Then sew up the armpit, and use a backstitch around the arms, tucking in the raw edges as you go (or before you start sewing the armhole).


Then do the next arm hole.

Now you are ready to do the hair. Find a book the same size as the doll.

Wrap your yarn around it until you have enough hair to span the length of the doll's head.


Cut it off the book


Place it centered on your doll's head and use a backstitch to sew it in place, going back and forth a few times pulling tightly and tie off.


The back will be bald. Finger comb the hair down to cover the back.


Begin sewing around the head using a backstitch at the eyeline, and go around the back, making sure to cover the back of the head with yarn and sew it down. Continue around to the other side.

Add another layer of hair just like the first one, but this time just sew along the top and don't sew the sides down.

Style her hair and enjoy!! :)

You can also easily add Elf ears by cutting and sewing little elf ear shapes out of the skin fabric and sewing them to her head. Do this before the hair!
If you have any questions feel free to ask!
Great Tutorial! I pinned it.
ReplyDeleteYou are beyond awesome!! DD keeps asking for tiny waldorf dolls.. I've been looking at the bigger ones asking if she'd like one and she'll say yes, but then measure with her hands and say but she wants it this small.. LOL..
ReplyDelete<3
thanks for the tute. I wanted to make a waldorf doll, and starting small seems like a good way to go. It's much less intimidating. Thanks a million for a great tute.
ReplyDeleteThank you for this wonderful and generous tutorial!
ReplyDeleteHi!!!! Too cute and very well explained!!!! Thank You
ReplyDelete